


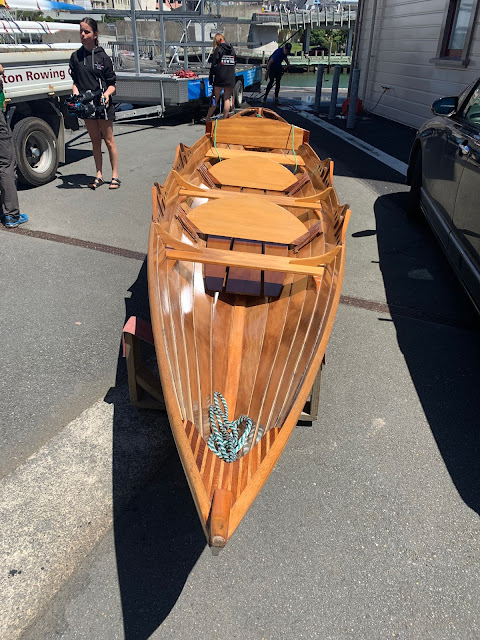
With the help of some of the club women rowers, we moved the boat down to the club and put it on the water.
 |
| Joe, supervising |
A few people turned up in anticipation, including Jenny, the only other person to have done anything to build the boat (she sanded one of the oars...a bit). A few others happened to be there anyway. Everyone wanted to be involved, so we had plenty of help to get the Badger on the water.
 |
| Many hands |
The first excursion saw Kim coxing, Joe at stroke, me at Bow. I had never had any concern for its ability to float: my main worry was about how the oars would perform.
 |
| Cracking knees |
The first thing that happened was a loud crack as Joe settled his bulk on his thwart. In fairness, the stroke thwart is wider than that at bow, so it would have more scope for flexing. The problem was that the knee on one side had separated from the hull. It was a disturbing moment, but quite fixable.
Immediately, we both had difficulties with the oars: the buttons need reshaping to give a smoother turn, but the bigger issue was that, at full length at the catch or the finish, the oars would jam in the thole. The solutions will be to slim the looms and to modify the tholes, rounding them a little. (I have started on the oars: when we get back from training camp, they'll be tested again.)
This little clip records our first few strokes: clearly we are struggling to row properly (some would say that's normal for us...) and I quickly gave up trying to feather the oars.
https://youtu.be/Op0iZCFT4yE
After our initial paddle, Charlotte and a crew mate of hers had a go, then two of our club women. They had similar difficulties, though to a slightly lesser extent: rowing a little shorter, they didn't get so stuck.
At the end of the session, I went out on my own. It was delightful: the boat sat level and was very responsive. I had a sense of skating above the water and I heard the stream of bubbles that a nicely running boat should give. Whether as a single, or a double, or a coxed double, the hull performs.


 |
| Charlotte guiding me, as always |
A few teething problems to be resolved, but, overall, a successful launch. Next stop: The Mighty Waikato.
It seems a long time ago that we started this project. That's surprising, because, in fact, it was a very long time ago. Our first blog was penned on 19th September 2010: the day after my birthday.
Now, a mere 11 years later, I am pleased to announce that the thing is complete, finished, knocked off, nailed (or epoxied), tick in box, crossed off, history, over and done with. Well, OK, not quite, because the project was to row it down the Waikato river, so I guess we are at the end of the beginning...
I have to confess to being quite emotional at finally reaching this stage: just look at this:
 |
| Just need a high tide now. |


 |
| A painter |
 |
| Oars complete |
Keep watching: we need to get it on the water: the proof of the pudding is in the eating (though, round here, they say, oddly, "the proof is in the pudding"). Joe and I have had lots of pudding, so it will be a true test of our workmanship.
There were a few tasks to be done before the build was complete. Despite almost incessant rain over the last few weeks, I managed to tackle each of these.
The Deck
A new layer of Danish oil to refresh:

 |
| Knee done |
 |
| Knees done |
 |
| Neasden |
I was quite anxious about fitting the rudder, to make sure it would hang vertical, be removable and also to be slightly higher than the keel, to help it pass over any snags. I think it's right...

The boat has 'tholes': squared U-shapes which hold the oars and form the pivots, or anchor points, against which the force of the stroke is applied.
 |
| Our thole |
 |
| Some well-used buttons |

Step 2: Clamping them together so they would conform to the right shape made it easier to assemble when it came to gluing.
 |
| Pre-shaping |
Step 3: Using clingfilm to prevent glue getting onto the sleeve, the pieces of leather are glued to each other, building up the thickness of the button. Since the oar tapers along its length, I was careful to build the buttons in the right place to give me the correct inboard measurement, so they'd conform perfectly to the shape of the loom when they are attached permanently.
The leather I have is quite thick: 6 layers has given me the 1-inch depth I was aiming for.
 |
| The pieces of leather, glued in position. |
I used our usual West Systems epoxy, mixed with some sawdust to match the colour of the leather. This means that the buttons are now quite stiff. A more flexible glue might have worked: several people recommend PVA, but I am keeping in mind that we'll be rowing on salt water most of the time.
Once the glue had set, I shaped each button using various very noisy tools and some fine sandpaper. I am guessing at the profile of the button where it touches the thole, but I suspect that, with use, they will wear to the right shape.
The skiff clubs on the Thames put a brass plate under the sleeve into which a couple or three bolts are driven, to help maintain the position of the button under pressure. Not having the ability to make such refinements, I have made the buttons a little wider than usual. That, the strength of the epoxy and our commitment to rowing with minimal effort should mean they stay in place and hold their shape.
 |
| The first pair of buttons. |
Once I am happy with the shape, these will be screwed to the oar, through the sleeve, probably with a bit of PVA glue to help stabilise them.
The construction and attachments of these buttons is one of the most critical parts of the whole build, as it will affect the whole experience of rowing the boat. I admit to being a little nervous...
The only metallic parts on the boat are the pintles and straps that support the rudder.
The pintles are vertical pins or posts onto which the straps hook. The straps sandwich the rudder and the pintles go through the round cylinders.
 |
| Straps (top) and pintles |

 |
| Signs of progress |
 |
| Looking very nice |
 |
| All with some coating |
 |
| More work needed on this one, I think |
You've got
to have knees
You've got to have knees
They're the things that take stock when you sneeze.
You've got to have knees
You've got to have knees
They only come in twos but never threes.
You've got to have knees
You've got to have knees
In winter fill them up with anti-freeze.
You've got to have knees
You've got to have Knees
Famous for having them are Bees.
You've got to have knees
You've got to have knees
If you want to see mine, say please.
You've got to have knees
You've got to have knees
They help you run away from falling trees
Knees. Wonderful knees
One of the last jobs needed to complete the boat is the fitting of the "knees". Not our knees, which are generally shot after a lifetime of servitude to Her Majesty, but the wooden braces that strengthen the structure, connecting the hull to the thwarts (seats, lubbers).
 |
| These.... |
 |
| Not those! |
The tricky bit about the knees is shaping them so that they fit perfectly to the hull, which slopes laterally, but also curves along the length of the boat. In addition, the overlap of the planking creates a small step or notch.
Thanks to the measured pace of this project (measured the way geological formations are measured), I have had years to ponder this problem.
I started with the chalk and sand method, which I had read about when looking at the construction of guitars: having cut the shape approximately, a layer of chalk is applied to the hull. The surface of the knee that needs to match is then pressed against the chalk, which leaves some small marks, showing the high spots where contact has been made. The marks are carefully sanded off (those being the spots where the wood is proud). This is repeated many times until, Lo! there is chalk all over the surface to be matched, as there are no longer any high spots. It's a brilliant solution, but takes ages and I rather lost enthusiasm...
My next solution was to try to shame Joe into taking responsibility for this detail. One of Joe's strengths is that he is impervious to shame, so that didn't work.
With a slight sense of panic at the thought of yet another year passing without completion, I resolved to tackle the knees again this weekend. The first step was a bit of displacement activity, which involved some fine sanding to ensure the knees were uniform, even though this was in the realm of the details on cathedrals that only God would notice.
 |
| I think you missed a bit... |
The technique I eventually hit upon was very simple: I just laid a bit of sandpaper along the hull where the knee had to fit and gently rubbed the knee back and forth, keeping it perpendicular to the stem-to-stern line. It was slow and quite hard work getting all four knees done, but after about an hour, they all fitted very nicely.
Before fixing them in place, I painted them with epoxy. As with every part of this boat, the finished articles are things of beauty.
 |
| An elephant also has four knees. |
